TV Mounting on Brick Walls Brisbane: The Ultimate 2025 Guide
Everything you need to know about mounting a TV on brick walls in Brisbane. We cover tools, anchors, safety, and step-by-step instructions for a secure install.
Mounting a TV on a brick wall is one of the most popular requests we get in Brisbane. Whether it's a trendy exposed brick feature wall in a New Farm apartment or the solid masonry walls of a downstairs rumpus room in a classic Queenslander, brick provides a stunning, industrial backdrop for your entertainment setup.
But here is the reality check: Brick is unforgiving.
Unlike a plasterboard wall where a mistake can be patched with a dab of Spakfilla, a cracked brick is permanent. Unlike timber studs that grip screws easily, masonry requires specialized anchors that expand with massive force. And unlike drywall dust that vaccuums up easily, red brick dust stains everything it touches.
In this comprehensive guide, we're going to walk you through exactly how to mount a TV on a brick wall safely, securely, and without destroying your home.
Part 1: Know Your Brick Type (Crucial)
Before you even pick up a drill, you must identify what kind of brick wall you have. In Brisbane, we typically encounter three main types. Each requires a different approach.
1. Solid Brick (The "Old School")
- Where found: Pre-1980s homes, internal walls of older apartment blocks, and structural columns.
- Characteristics: These bricks are solid clay all the way through. They are heavy, dense, and extremely strong.
- Mounting Difficulty: Medium.
- The Challenge: They are hard to drill into. You need a powerful drill.
- The Anchor: Sleeve Anchors (Dynabolts) or Concrete Screws (AnkaScrews). These are the strongest walls to mount on.
2. Extruded / Cored Brick (The "Modern Standard")
- Where found: Most homes built after 1990, face brick on modern houses.
- Characteristics: These bricks have holes (cores) running vertically through them to make them lighter and cheaper to fire. Usually 3 to 10 holes per brick.
- Mounting Difficulty: High.
- The Challenge: If you drill into a hollow section, a standard expansion anchor has nothing to grip against. It will spin and eventually pull out.
- The Anchor: You MUST use Universal Plugs (like Ramset Universals) that knot up inside the cavity, or chemical anchors for very heavy loads. Do not use Dynabolts in hollow brick—they can crack the thin shell of the brick.
3. Brick Veneer (The "Imposter")
- Where found: The vast majority of suburban Brisbane homes.
- Characteristics: From the outside, it looks like a brick house. But the brick is just a "skin". The structural wall behind it is a timber frame with plasterboard inside.
- Mounting Strategy:
- Internal Walls: You are actually mounting to the plasterboard and timber studs, not the brick. The brick is on the outside of the house.
- External Walls (Alfresco): If mounting a TV outside on the patio, you are drilling into the face brick. Treat this as Extruded Brick (#2).
Part 2: The essential Tool Kit
Do not attempt this with your grandfather's old hand drill. You will burn out the motor and ruin your drill bits.
1. The Drill: Hammer Drill vs Rotary Hammer
- Hammer Drill (Standard): Good enough for 1-2 holes in soft brick. It uses two mechanical discs clicking together to create vibration. It screams loud and is slow.
- Rotary Hammer (SDS Plus): The professional choice. It uses a pneumatic piston to smash the drill bit into the wall. It melts through brick like butter. If you have more than 4 holes to drill, rent or borrow one of these.
2. The Bits: Masonry Only
- You need Tungsten-Carbide Tipped masonry bits.
- Sizes: typically 6mm (pilot), 8mm, or 10mm depending on your anchor.
- Pro Tip: Buy a quality brand (Bosch, Sutton, Makita). Cheap bits overheat and melt.
3. The Anchors (The Hero of the Story)
Never, ever use the cheap plastic "wall plugs" that come in the box with your TV mount. They are garbage. Throw them away.
- For Solid Brick: M8 or M10 Sleeve Anchors (Dynabolts). These expand metal-against-brick for a hold that could support a car.
- For Hollow Brick: Ramset Universal Anchors (Red or Orange). These heavily textured nylon plugs twist into a knot inside the brick cavity, creating a "key" that can't be pulled out.
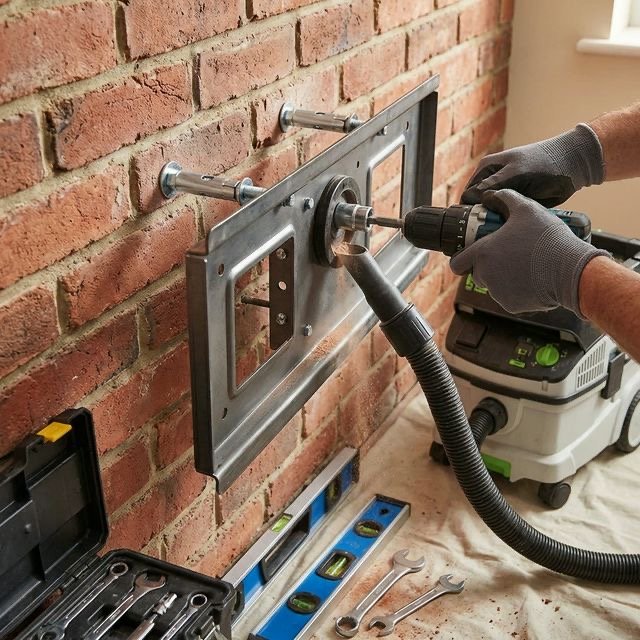
4. Dust Control
- Brick dust is distinctively red, fine, and impossible to get out of white carpet.
- Technique: Have a helper hold a vacuum nozzle immediately under the drill hole while you drill. Tape a plastic bag to the wall if working alone.
Part 3: Step-by-Step Installation Guide
Follow these steps for a failsafe installation.
Step 1: The Layout (Measure Twice, Drill Once)
Hold your bracket against the wall. Use a Spirit Level to ensure it is perfectly straight. (Do not trust the mortar lines—bricklayers aren't perfect!). Mark your 4 mounting holes with a pencil or sharpie.
CRITICAL RULE: Aim for the Center of the Brick. Never drill into the mortar (the cement between bricks). Mortar is soft and creates a weak bond. Over time, the vibration from your TV sound system can cause the anchor to wiggle loose. Always drill into the baked clay brick itself.
Step 2: The Pilot Hole
Start with a smaller drill bit (e.g., 5mm or 6mm). Set your drill to Hammer Mode. Drill straight and steady. Let the drill do the work; don't lean your entire body weight into it. Depth Check: Wrap a piece of electrical tape around your drill bit to mark the length of your anchor + 10mm.
Step 3: The Main Hole
Switch to your final size bit (e.g., 10mm for a Dynabolt). Drill out the pilot holes to the correct size. Keep the drill straight. If you wobble, you make an oval hole, and the anchor won't grip.
Step 4: Clean The Hole (Don't Skip This!)
This is where DIYers fail. The hole is now full of red dust. If you shove an anchor into a dusty hole, it slips on the dust like marbles. Solution:
- Vacuum the hole.
- Use a pipe cleaner or bottle brush to loosen strict dust.
- Vacuum again.
- (Pro move): Use a "puffer" bulb to blow the final dust out.
Step 5: Insert the Anchors
- Sleeve Anchors: Tap them in gently with a hammer until flush.
- Nylon Plugs: tap in until flush.
Step 6: Mount the Bracket
Align the bracket holes with your anchors.
- Sleeve Anchors: Tighten the nut with a socket wrench. You will feel it get tight, then easier, then tight again as it expands. Stop when it's firmly tight—do not overtighten or you will crack the brick!
- Nylon Plugs: Drive the heavy gauge screw (Coach Screw) into the plug. The screw forces the plug to expand.
Step 7: The Hang Check
Before putting the TV on, hang your own body weight on the bracket (carefully). Grab it and pull. If it can hold you (80kg+), it can easily hold your 25kg TV. If it wiggles? Do Not Mount The TV.
Part 4: Managing the Messy Cables
The biggest downside of brick walls: You can't hide cables inside them. (Unless you want to cut a channel with an angle grinder, creates a dust storm, and re-plaster—a huge renovation job).
So, what are your options?
Option A: Paintable Trunking (The Cleanest Easy Fix)
Use "D-Line" or similar half-round PVC trunking.
- Stick the self-adhesive back to the brick.
- Route cables inside.
- Snap the lid on.
- Paint it: Paint the trunking the same color as the brick (or the mortar color) to make it blend in.
Option B: The "Industrial" Conduit
Embrace the look. Use galvanised metal conduit or copper pipe to run the cables down the wall. This looks fantastic in loft-style apartments or industrial renovations.
Option C: The "Feature Wall" Hack
Build a "false wall" or timber batten section in front of the brick. Mount the TV to the timber, and run cables behind the timber. This preserves the brick while hiding cables.
Part 5: Troubleshooting Common Fixes
Problem: "I hit a steel bar!"
You drilled 20mm and hit something hard.
- Diagnosis: You hit reinforcement bar (Rebar) in a concrete filled block.
- Fix: Stop. Move your mount up or down 30mm and try again. Don't try to drill through rebar without a specialized cutter.
Problem: " The brick crumbled."
You drilled, but the face of the brick blew out/cratered.
- Diagnosis: Old, brittle brick or "soft red" brick.
- Fix: Do not use an expansion anchor here—it will blow the brick apart more. Use a Chemical Anchor. Inject masonry epoxy resin into the hole, insert a threaded stud, and wait for it to cure. It bonds the brick together rather than stressing it.
Problem: "The anchor is spinning."
You tighten the screw, but the whole anchor turns.
- Diagnosis: The hole is too big / oval shaped.
- Fix: Remove the anchor. Fill the hole with "Selleys Knead-It" or similar epoxy putty. Redrill carefully. Or use a larger size anchor.
FAQ: Brick Mounting
Q: Can I mount a 85-inch TV on brick?
A: Yes. In fact, a solid brick wall is safer for an 85-inch TV than a plaster wall. The shear strength of masonry anchors is massive. Four M10 Dynabolts can theoretically hold hundreds of kilos.
Q: Does mounting damage the brick permanently?
A: Yes. You are drilling holes. If you remove the TV later, you can fill the holes with colored mortar, but the patch will always be slightly visible.
Q: Can I use "No More Nails" or glue?
A: Absolutely not. Glue pulls away from masonry over time due to moisture changes and oxidation. Your TV will fall.
Q: My wall is "Rendered Brick". Is that different?
A: Treat it as brick, but be careful of the render (plaster) layer. It can be 10-20mm thick. Ensure your anchor is long enough to pass through the render and bite deep into the solid brick behind it. You may need extra-long anchors.
When to Call the Pros
If reading about "SDS Drills" and "Chemical Anchors" makes you nervous, that's okay. Brick mounting is high-stakes DIY.
Call MountPro Brisbane if:
- You don't have a Hammer Drill.
- You aren't sure if your bricks are solid or hollow.
- You have expensive porcelain tiles over the brick.
- You want a guarantee that your $3,000 TV won't hit the floor.
We carry industrial-grade layout tools, every type of masonry anchor known to man, and dust extraction systems to keep your carpet clean.
Ready for that industrial look? Contact us today for a quote on your brick wall installation.
Need Help Mounting Your TV?
Get a professional, safe, and clean installation from MountPro Brisbane today. 5-year warranty included.
Get a Free Quote